Tuesday, September 17, 2013

Water Bottle Easy Carry! AKA Buckfast Buddy: Festival time!


     Here's a quick but useful project I threw together out of necessity: A water bottle with a cross-chest strap.  I made a few of these to bring to a festival recently: who wants to be carrying a bag around all day?

What you need: 
Wool / string.
Any size crochet hook.  Can also be done without a hook if you have nimble fingers.
A water bottle.  Preferably one with a sports cap for maximum efficiency! 

 To allow for variations in the size and shape of water bottles I can only give general instructions.
You will be using the bottle as a guide and starting at the base of the bottle.
(Number of chain stitches is approximate: Increase and decrease when necessary)

To Begin Make 8 chain, join with sl-st to make a ring.
Round 1 dc (X) in first chain of ring, *ch 6, dc in ring, 3 times*, ch 6, sl-st in dc.


Round 2 sl st 3, *ch 6, dc in loop of previous round, 3 times*, ch 6, sl-st in dc.
Round 3 Same as Round 2.
Continue working rounds in this way until you have decreased towards the neck of the bottle.
Finish by chaining the loops together, tight around the bottle eg:
Finish *ch 2, dc in loop* 4 times.
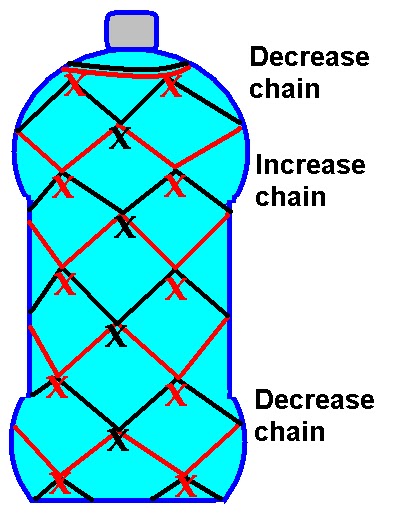


To crochet the strap simply make a chain from where your thread is to the base of the bottle: Gauge it so that the bottle will hang comfortably at waist height.  Measuring this is best done with a full bottle as the chain will stretch with the weight.
Ch 200 approx.
sl-st to the ring at bottom of bottle.
dc along the chain to strengthen and fasten off.
Add tassles and liquid at your own discretion.


Bright & Light Crochet Tank Top

        I found a pretty crochet and mesh top in a charity shop many moons ago and it's still one of my favourites, bobbles and all.  For this project I decided to try to recreate the top, with a few exceptions: Bright colours and no sleeves.  I decided to try my hand at an Irish Lace style motif for the back piece.  Having no pattern, I bought the finest crochet thread i could find and dived in.

Purple flower motif, orange mesh & chiffon.
     Shopping for crochet thread locally left little choice of colour beyond pastels, so I took the only bight colours available.  Luckily I realised I had an old blouse in similar material to what my original top was made of.  Even better it matched my crochet thread!  In the photo you can see the flower motif I made; a basic leaf motif with free-form stem.  Once finished I wet it under a tap, pinned it to a board and ironed it flat (with a towel on top of the motif to protect it from the heat).

Using the original top as a guide.

     I also made a few small flower motifs to include in the crochet insert in the front of the top.  I worked the mesh background around the motifs, in the style of traditional Irish lace. I wasn't masochistic enough to work the back piece like this.  Instead i crocheted the mesh and later sewed on the flower motif.  If I was going to use motifs in over 50% of the back piece it would make more sense to work the mesh around them.


Flower motif back piece.
     Below is the finished project.  I had expected chiffon to be difficult to work with: Slippery, fraying and stretchy., but I couldn't resist using it because the colours matched my thread so well.  If I was to do this again I'm sure I could resist!  Due to the chiffon's stretchy nature I accidentally cut the upper bodice piece too small.


     A little tip for working with fine crochet thread: When working long rows I find my left hand (feeding the thread) can cramp very easily due to the lack of bulk to grip.  In order to reduce the risk of the dreaded RSS, and take the pain out of delicate work, I whipped up one of these things...


     Don't ask me what I call it.. but it's great!  The bulk of the wool makes it easier to comfortably grasp the fine thread.  You could use a glove, but if you're like me you would prefer to cut some of the fingers off, leaving only the fingers you use to keep tension.
 

Saturday, February 2, 2013

DIY Pin-cushion with pin storage


     I'm making a dress using newspaper print fabric.  Sewing by hand for lack of a machine I of course got distracted and found another project to take a break.  In fairness making a pincushion would give me a practical advantage while sewing the dress!

     Heating a penknife over a candle I cut/melted a large hole in the plastic lid of an empty face cream jar.  I cut a circle of fabric around twice as large as the lid.  I had no stuffing so used a ball of fluffy wool, putting it in the center of the fabric circle and pushing through the hole in the lid.  I cut a round circle of cardboard and wedged it into the lid to keep the wool in.  I glued the excess cloth to the cardboard using PVA glue.


...then I got back to sewing my dress.

Monday, December 24, 2012

Miniature Crochet Bunny with dress


Here's my second attempt at a miniature stuffed toy.  Bunny has a fluffy tail and a crochet dress.  Also a slightly creepy face. I used sewing thread and a size 0.25 crochet hook.


Tiny crochet teddy bear


          Having seen some incredibly tiny crochet stuffed toys I am determined to make some.  This teddy bear is my first attempt, and while he is not perfect, I'm confident I can improve with practice.  This little guy measures about half an inch tall and is made using sewing thread, a 0.5mm steel hook and fluff taken from a cotton ear bud / Q-tip. 


          I didn't have a pattern to work from so I winged it.  I attempted a magic ring but I was impatient to get going and finding it awkward to hold the ring in place I began with a ring of five chain.  When the bear was finished I had to stitch the ring closed, so I will use a magic ring for my next attempt.  I worked in double crochet (Single crochet USA) and formed the body and head in one piece, working in a spiral as opposed to rounds.  I stuffed the body as I worked, and sewed eyes, nose and mouth.

          The arms and legs were made by sewing thread in place on the body, then chaining 8 and dc in each chain.  I realised the limbs were way too long and skinny, so I folded them in half and stitched, making them half the length and double the thickness.  To avoid this I should have chained 4 and dc in each chain, then dc in each dc.  Each ear is a row of 3 dc, then 2 dc and slip stitch to last dc.


          Here's the little guy in a little paper box, to save him from being lost.  There are many easy tutorials online for Origami paper boxes.  This one is made using Post-it notes.  After making the lid I cut a square out and made a window using clear plastic.  As you can see from the photo, my box-making skills need improvement also!


Saturday, December 1, 2012

Cushion cover


          My generous friends and work colleagues donated lots of clothes to help me make a rag-rug for the sitting room floor.  I've a small bag of these clothes left over from that project so I've begun finding uses for them.  One interesting item was a T-shirt with a funny slogan on, which I quite like, so I used it to make a cushion cover.  The polka-dot fabric was part of a top which had a concealed zipper which was almost exactly the width of my cushion!  I love it when things come together!  

Friday, November 23, 2012

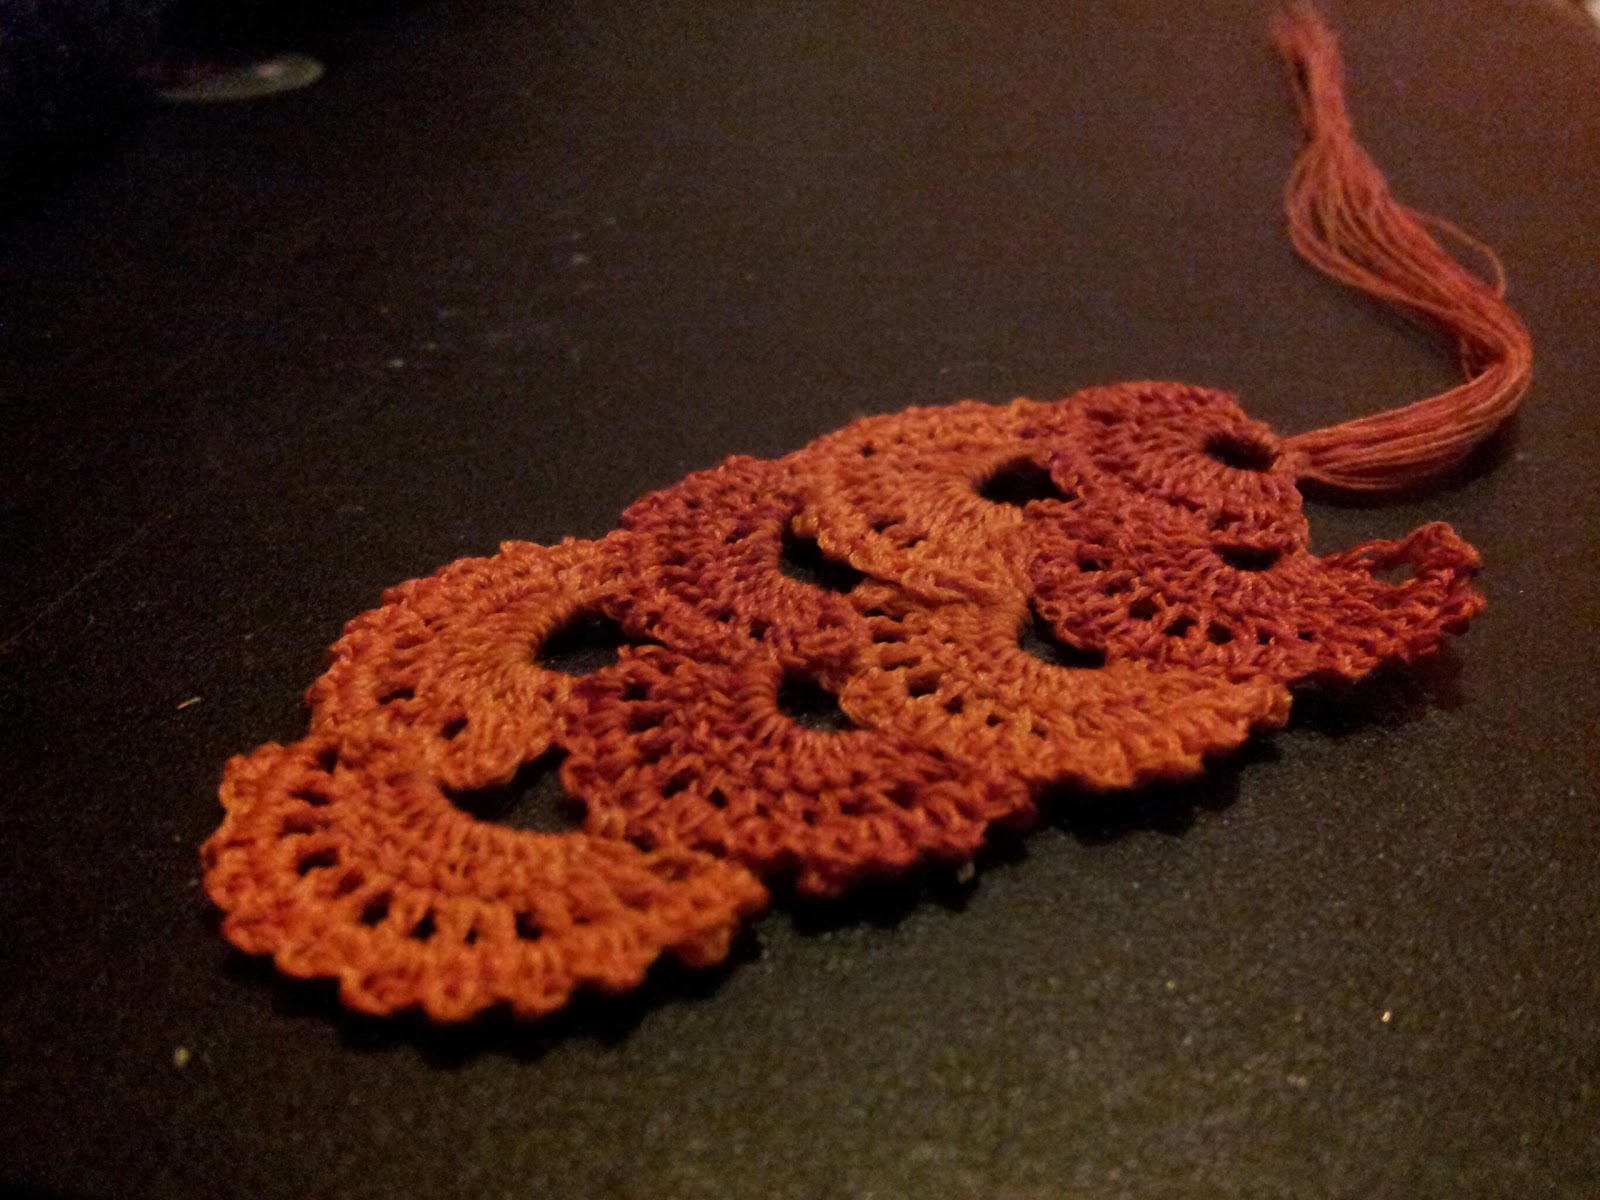
Crochet Fan Bookmark - pattern by Crochetroo


          Having made a large crochet rag-rug, my next project is to the other extreme.  Instead of strips of cloth two inches wide and a 10mm hook I'm using regular sewing thread and a 0.8mm hook.  I've crocheted with sewing thread before and know the finished product is very delicate and small.  For this item I am using double lengths to bulk up the project a little and make it stronger.  Using two threads on a tiny project like this is awkward, but it allows for more experimentation with colours. 


I won't be showing a tutorial for this, as the pattern is not mine.  If you would like to give this a shot or buy a bookmark like this follow this link to Crochetroo's blog.