Tuesday, August 26, 2014

Cat Crinkle Wrestling Sausage Toy


Another cat craft project!  I swear I'm not a crazy cat lady; I have just one cat, but he deserves fun toys to play with.  This Wrestling Sausage is a great idea I found online today at littlegreencat.com (full link at end of tutorial).  The sausage shape is perfect for wrestling.  It's narrow so it's easily trapped in a 'head-lock', long enough for back-leg scratching and it crinkles!  I included the following hi-tech features; a bell / rattle, a feather and ribbon streamers!  This toy was an instant hit.

 Materials

Rectangle of cloth aprox 12" x 5"
T-shirt cotton is cheap.  You could use any material that will withstand some scratching.  I don't recommend wool for this reason.  I used a patchwork of various material simply because it was going unused from a previous project.  The variety of texture might even be interesting for scratching.

Crinkly sounding stuff;
You can use any, or all, of the following.  Listed in order of crinkliness,
Mylar, clean crisp / chip bag foil, plastic shopping bag, tracing paper, Cellophane, regular paper.

A shoelace, piece of string or cord

Optional extra's

To make a rattle
A clean plastic lid from a shampoo bottle, glue-stick or something similar, aprox. 2" diameter.
A bell or bead.
Scrap of card
Tape

Feathers, ribbons or strips of cloth to make streamers.  I can't emphasise feathers enough!
Dried Catnip, if your cat is into it.

Method

Fold cloth in half lengthways, with right sides together.  Sew along one short side and long side.

Sewing short side.

Sewing long side.

This creates a tube.  Turn tube right side out.  Roll up the crinkly paper, scattering Catnip between the layers if desired.  Insert the roll of paper into the tube.

Crinkle power!


To make the rattle simply place a few beads or a bell into a plastic cap.  Cut a piece of card to close the rattle and tape the entire piece to ensure the beads cannot fall out.

Cutting guidelines shown on piece of card: Cut along the straight lines.

Place open end of cap on the card and fold flaps down the sides.

Tape it all up.

We'll bundle the rattle up in wool and cloth so that it won't be too hard.  I used black, fluffy wool but you could also use a few scraps of cloth or cotton wool.  I sewed this inside a scrap of cloth, being extra cautious considering there are small beads inside (choking hazard).

Rattle nestled in wool

Sewing the rattle and wool inside a scrap of cloth

Rattle done!  Now for the streamers.  I sewed ribbons, a feather and a shoelace onto a little scrap of cloth to keep them together.  The shoelace is for the human to play with, to make the toy move, wiggle and fly.


Finally, insert the rattle and the cloth end of the streamers into the open end of the sausage.  If there is empty space just stuff with more cloth, wool or paper.  Sew it up, and shake it at your kitty!

Streamers and shoelace attached.

I can't over-emphasise the importance of feathers.

Any other ideas for improving this toy?  I'd love to hear them.


Project idea from
http://www.greenlittlecat.com/day-15-weekend-homemade-cat-toy-ideathe-30-day-green-cat-challenge/

Thursday, January 16, 2014

Cat Scratching Tray

     I've seen a few of these cardboard scratching trays for cats.  Most of the commercial ones are rectangular but I chose to make the circular design.  Why buy one when you likely have access to all the materials you need to make one?  In fact, many of us pay to dispose of cardboard, so make some savings while satisfying your urge to create.

Materials needed:
         Corrugated cardboard: Boxes, packaging, etc.
         Stanley / craft knife / scalpel or scissors
         Tape
         Ruler or, in my case, a plank of wood. Anything you can use to cut a straight line.

     Using a plank of wood as a ruler I used a Stanley knife to cut strips of cardboard, making sure they were of similar widths by cutting them the width of the plank.  If using a ruler you can measure the widths, but that's a lot of effort for something which doesn't require such technical control.  Cut across the corrugation, not along it, so you see the zig-zag of cardboard filler within the cut.


      Roll a strip of cardboard up tight: see photo above.  Pull the strips through your thumb and forefinger to soften them and make them easier to roll up tight.  Secure the end of each strip with tape, attach the next strip and continue.  Eventually you will have made something that looks like this.


      I was so absorbed in the project that I forgot to photograph the last step: making a base for the tray.  A base is necessary if you intend to scatter some catnip into the tray.

Pizza box recycling logo seemed appropriate

      Place your scratching tray on a piece of cardboard which is of larger diameter than the base of the tray.  A few inches is plenty.  Draw around the tray, then draw a larger circle around that, making a border a few inches wide.  Cut a series of slits into the border, to create tabs. 

     Replace your tray into the circle and bend the tabs to touch the sides of the tray.  Wind some tape around the tabs to secure the base.  Cover with another strip of cardboard to hide the construction.  For illustration I've reproduced and photographed the technique below.  Picture the orange Post-it as the piece of cardboard.  C'mon guys, use your imagination here!


      Add catnip and cherish your unscratched furniture! 

Wednesday, January 15, 2014

DIY Cat Box Toy!

Take a cardboard box, cut some holes in it, place ball inside, preferably bigger than the holes, and enjoy!  Use a ball of tinfoil if you haven't any others.

Thursday, January 9, 2014

Cat Tree

     A new addition to the household has proved himself to be an avid climber.  Within hours of arriving this kitten had conquered most of the tall surfaces in the flat.  When he wasn't climbing he lay gazing up at the curtain rail and ceiling, probably wondering why us stupid humans have not created a series of shelves or such to utilise the ample space up there.  While the idea of creating a circuit of walkways and ladders for my kitten is appealing, drilling numerous holes in the walls just isn't practical in rented accommodation.  Me being me, I fancied something that didn't cost a penny.  Here's what I came up with.


     No trees were harmed in the making of this cat tree.  No live ones anyway.  This tree was felled a long time before I went looking for it.  It's bark had fallen away, and the wood is dry, making it a relatively clean piece.  The trunk of the tree fit well into the hole in the cable reel, I only had to whittle away an inch or so to make it fit.


     Due to the lack of bark and it's dry condition, the tree is smooth and hard, making it difficult for a kitten to sink his claws into.  I braided some wool and wrapped it tightly around the trunk. Twine or rope would be just as suitable and involve less work.  I made no effort to weave in the ends as I could see he enjoyed playing with them.  Top tip: keep the cat out of the room when you do this step: the attraction of wool is just too much for a kitten to resist.  This took much longer than it would have if I hadn't had to compete with paws and claws!


     Last, but certainly not least, hang some toys on the tree.  Baubles, pom-poms, bows, bells, tinsel, whatever you can find.  Look for shiny, soft or noisy things especially.  Everything is a toy when it's dangling near a kitten: they find most things interesting because the world is still so new to them.  Be aware that long strings may prove dangerous to a climbing kitten:  Best to keep them short or use light yarns which can break easily in the event the kitten gets tangled in them. 


     I'm so happy with this project.  Scholesey is even happier!  The tree gives him access to the curtain rail, from which he presides over his territory and his pet humans.  After a long nap he awakes hyperactive, charging about and scaling the tree in seconds.  He challenges himself to find ever-more difficult ways of making it to the top and becomes monkey-like, swinging from branch to branch.  He enjoys nestling in the crook of a branch and batting at the toys up there, and we get great pleasure out of watching his antics.  Have you the honor of sharing your home with a tree-cat?  You know what to do.


Tuesday, September 17, 2013

Water Bottle Easy Carry! AKA Buckfast Buddy: Festival time!


     Here's a quick but useful project I threw together out of necessity: A water bottle with a cross-chest strap.  I made a few of these to bring to a festival recently: who wants to be carrying a bag around all day?

What you need: 
Wool / string.
Any size crochet hook.  Can also be done without a hook if you have nimble fingers.
A water bottle.  Preferably one with a sports cap for maximum efficiency! 

 To allow for variations in the size and shape of water bottles I can only give general instructions.
You will be using the bottle as a guide and starting at the base of the bottle.
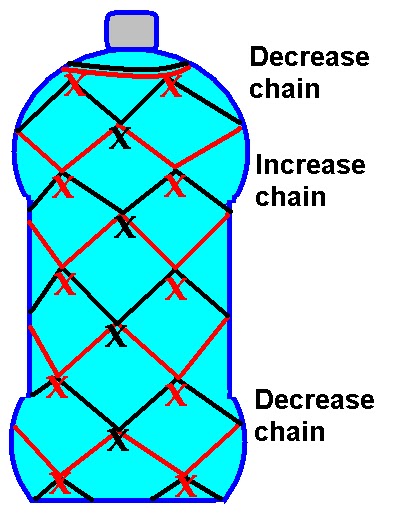
(Number of chain stitches is approximate: Increase and decrease when necessary)

To Begin Make 8 chain, join with sl-st to make a ring.
Round 1 dc (X) in first chain of ring, *ch 6, dc in ring, 3 times*, ch 6, sl-st in dc.


Round 2 sl st 3, *ch 6, dc in loop of previous round, 3 times*, ch 6, sl-st in dc.
Round 3 Same as Round 2.
Continue working rounds in this way until you have decreased towards the neck of the bottle.
Finish by chaining the loops together, tight around the bottle eg:
Finish *ch 2, dc in loop* 4 times.


To crochet the strap simply make a chain from where your thread is to the base of the bottle: Gauge it so that the bottle will hang comfortably at waist height.  Measuring this is best done with a full bottle as the chain will stretch with the weight.
Ch 200 approx.
sl-st to the ring at bottom of bottle.
dc along the chain to strengthen and fasten off.
Add tassles and liquid at your own discretion.


Bright & Light Crochet Tank Top

        I found a pretty crochet and mesh top in a charity shop many moons ago and it's still one of my favourites, bobbles and all.  For this project I decided to try to recreate the top, with a few exceptions: Bright colours and no sleeves.  I decided to try my hand at an Irish Lace style motif for the back piece.  Having no pattern, I bought the finest crochet thread i could find and dived in.

Purple flower motif, orange mesh & chiffon.
     Shopping for crochet thread locally left little choice of colour beyond pastels, so I took the only bight colours available.  Luckily I realised I had an old blouse in similar material to what my original top was made of.  Even better it matched my crochet thread!  In the photo you can see the flower motif I made; a basic leaf motif with free-form stem.  Once finished I wet it under a tap, pinned it to a board and ironed it flat (with a towel on top of the motif to protect it from the heat).

Using the original top as a guide.

     I also made a few small flower motifs to include in the crochet insert in the front of the top.  I worked the mesh background around the motifs, in the style of traditional Irish lace. I wasn't masochistic enough to work the back piece like this.  Instead i crocheted the mesh and later sewed on the flower motif.  If I was going to use motifs in over 50% of the back piece it would make more sense to work the mesh around them.


Flower motif back piece.
     Below is the finished project.  I had expected chiffon to be difficult to work with: Slippery, fraying and stretchy., but I couldn't resist using it because the colours matched my thread so well.  If I was to do this again I'm sure I could resist!  Due to the chiffon's stretchy nature I accidentally cut the upper bodice piece too small.


     A little tip for working with fine crochet thread: When working long rows I find my left hand (feeding the thread) can cramp very easily due to the lack of bulk to grip.  In order to reduce the risk of the dreaded RSS, and take the pain out of delicate work, I whipped up one of these things...


     Don't ask me what I call it.. but it's great!  The bulk of the wool makes it easier to comfortably grasp the fine thread.  You could use a glove, but if you're like me you would prefer to cut some of the fingers off, leaving only the fingers you use to keep tension.
 

Saturday, February 2, 2013

DIY Pin-cushion with pin storage


     I'm making a dress using newspaper print fabric.  Sewing by hand for lack of a machine I of course got distracted and found another project to take a break.  In fairness making a pincushion would give me a practical advantage while sewing the dress!

     Heating a penknife over a candle I cut/melted a large hole in the plastic lid of an empty face cream jar.  I cut a circle of fabric around twice as large as the lid.  I had no stuffing so used a ball of fluffy wool, putting it in the center of the fabric circle and pushing through the hole in the lid.  I cut a round circle of cardboard and wedged it into the lid to keep the wool in.  I glued the excess cloth to the cardboard using PVA glue.


...then I got back to sewing my dress.